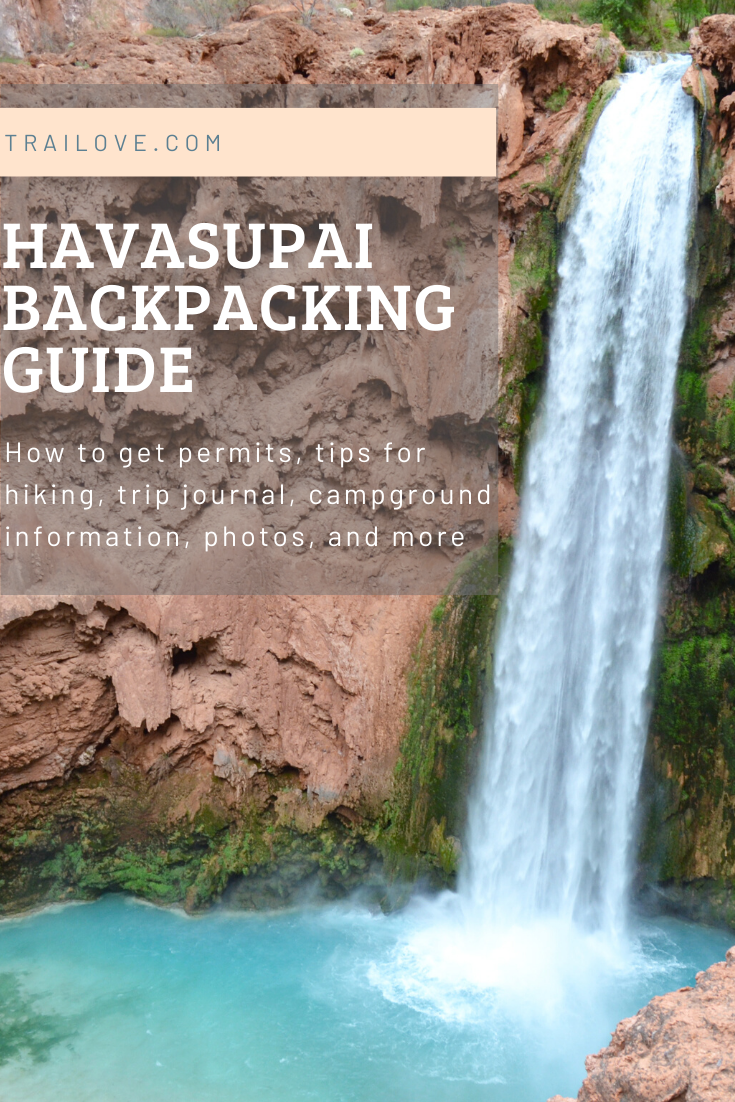
Havasupai Backpacking guide

Updated January 2020
The turquoise falls of Havasupai have become a coveted destination for experienced backpackers and first time hikers alike. While the sights exceed expectations in person, you’ll feel like you’re hiking and camping with an entire city. Due to the increasing popularity of the hike, the Havasupai Tribe has implemented a very competitive permit system which releases all slots on February 1st each year (see permit section below for all the details you’ll need). We backpacked Havasupai in April of 2019 after getting a taste of Havasu Creek while rafting the Grand Canyon. I was excited to return and finally see the waterfalls! The hike itself is tough – 10 miles just to get to camp – but I was pleasantly surprised by how scenic it was long before the waterfalls.
Itinerary & Trip Journal
Although the permitting system only allows for 4 day 3 night trips, we opted to spend only 2 nights camping in Havasupai. That was the right amount of time for our group to explore the creek and waterfalls but the extra day could definitely make this a more relaxing trip and give you some time to hike to the Colorado River confluence as well. The section below includes my journal notes and photos from our 3 days in Havasupai.
Day One: Trailhead to Campground (10 miles, -2500 feet)
Two years ago we rafted through the Grand Canyon and on a quick side trip got our first taste of Havasupai’s waters. On that trip, I didn’t quite make it to Beaver Falls but the hike along the creek was enough to draw us back. So we’re here! Yesterday we drove to Peach Springs, Arizona near the Hualapai Reservation and stayed in the Hualapai Lodge. This trip is extra interesting for me because I’m 7 weeks pregnant. I’ve been struggling with nausea and morning sickness but I’m starting to get into a better eating/snacking routine to keep my stomach from feeling empty and sick. Still, it’s been difficult eating – even at the casual hotel restaurant this morning I had to try hard not to puke! Today though the fresh air and exercise were a great distraction and I felt pretty good overall.
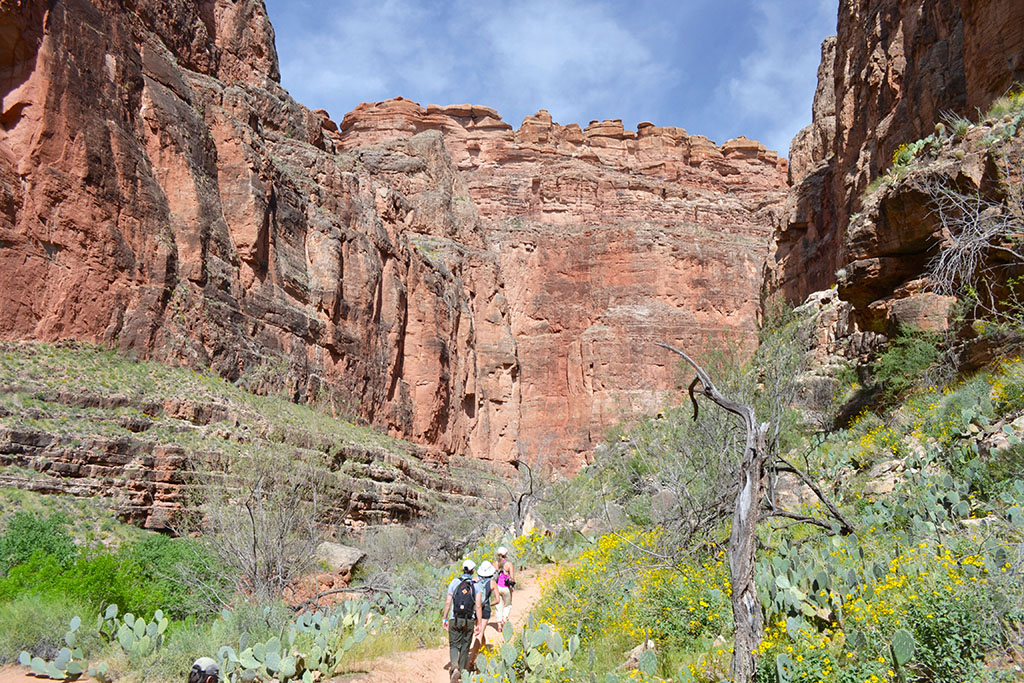
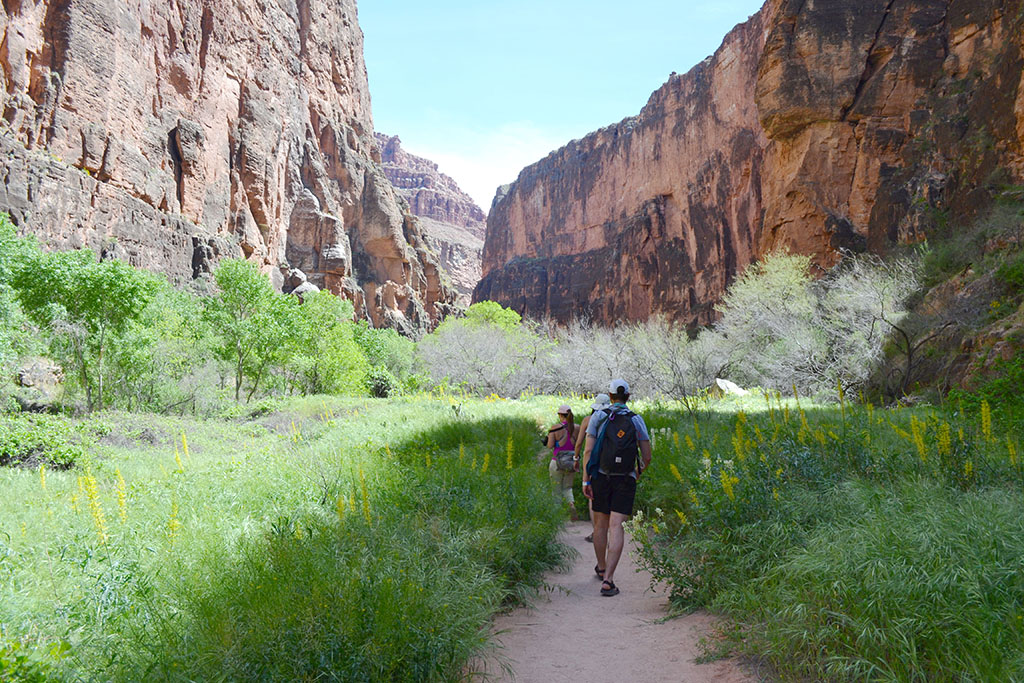
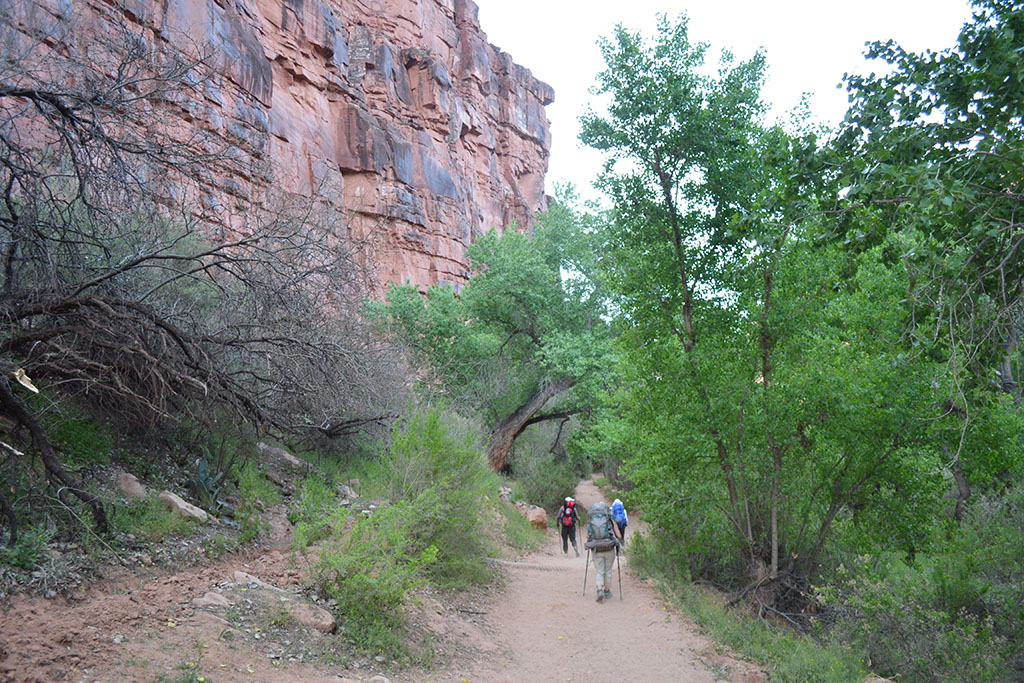
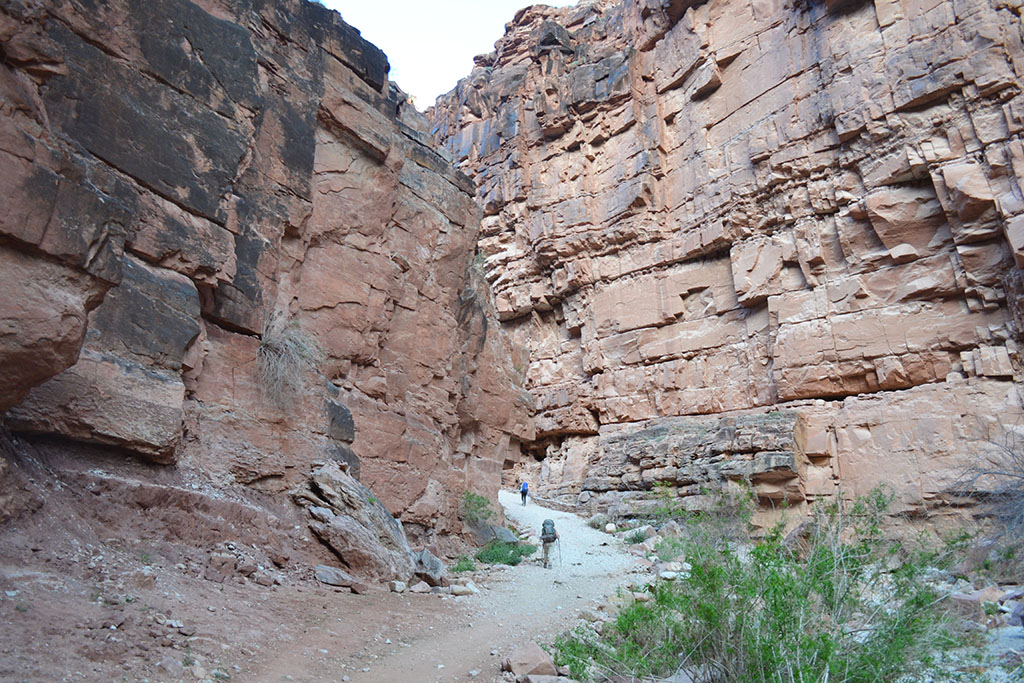
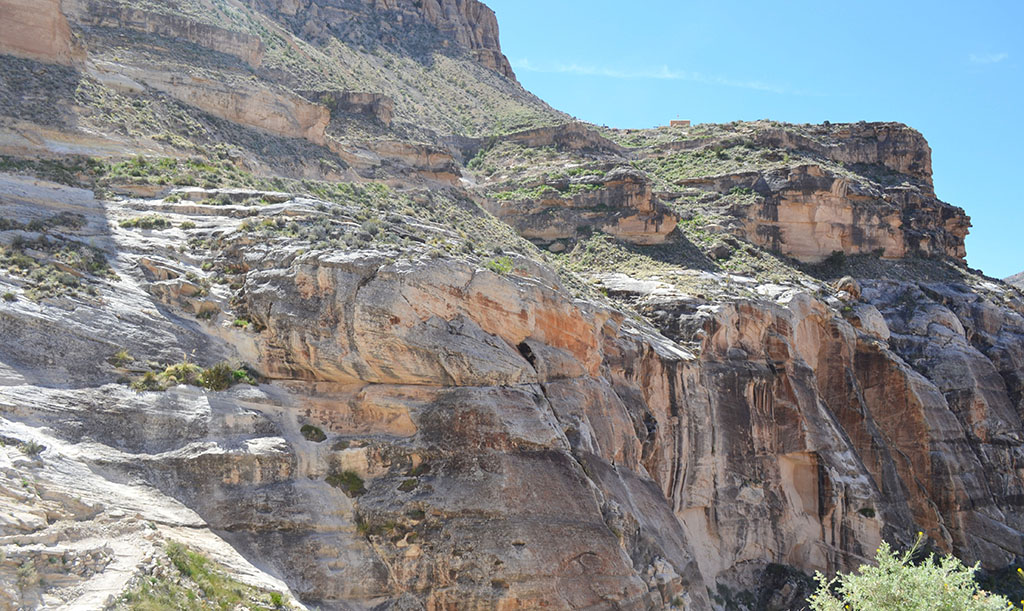
We got to the trailhead around 9:30AM. Not the earliest, but it doesn’t get too hot yet in April so the walk was mostly cool and even shaded at some points. Luckily (for today at least!) it was all downhill. The trail started with some steep switchbacks and I immediately noticed some hikers with light packs using the mule service. It looked tempting for the way back up, but Jason is generously carrying most of our weight so that I can take it easier than usual.
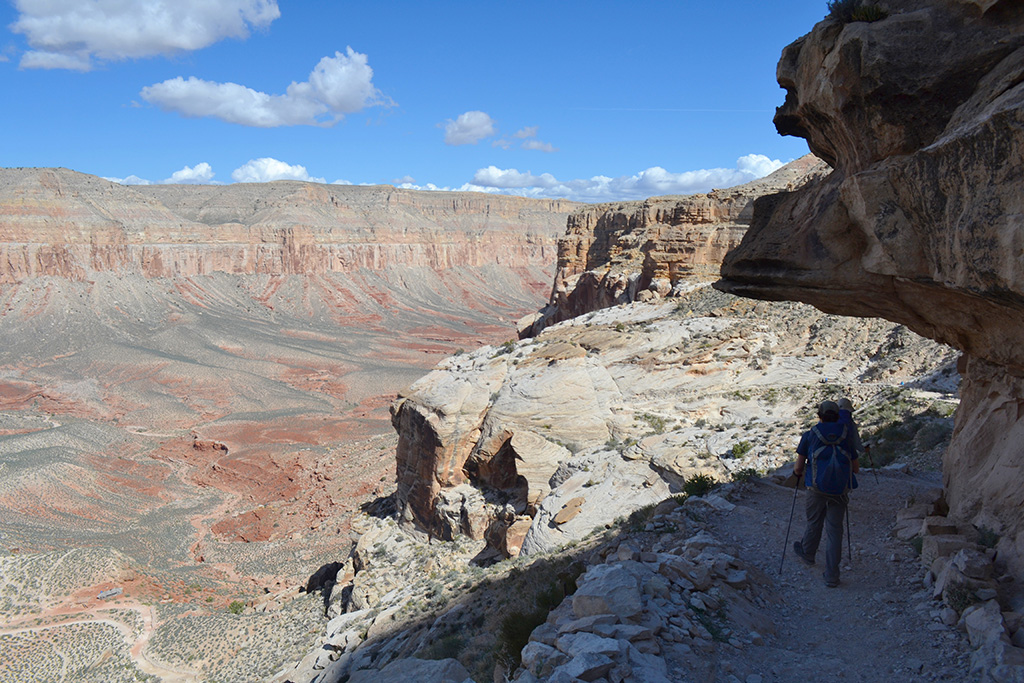
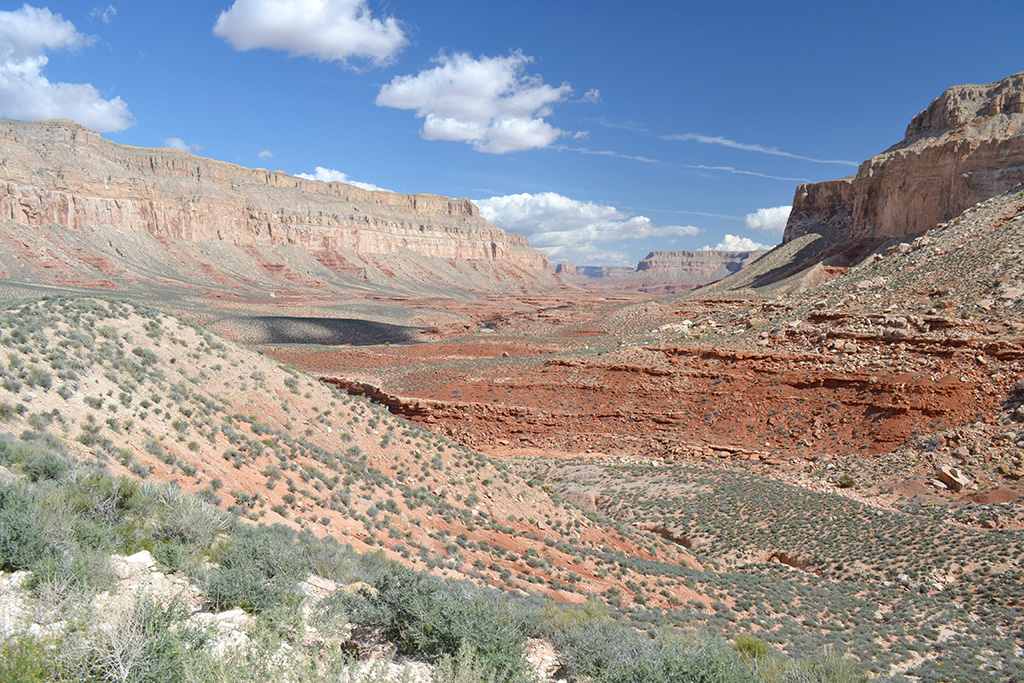
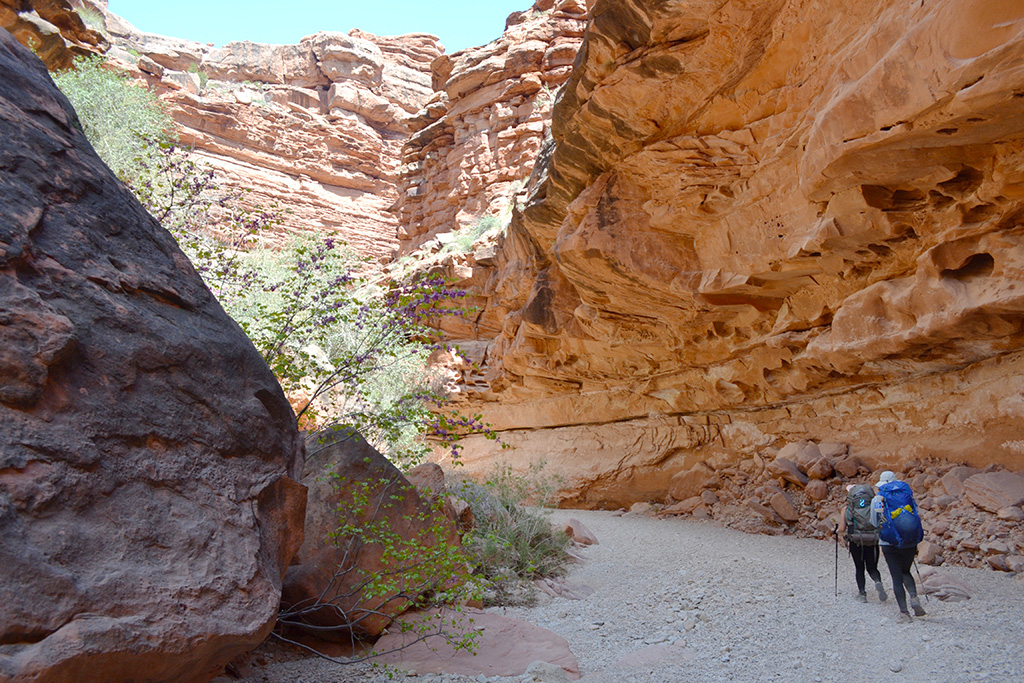
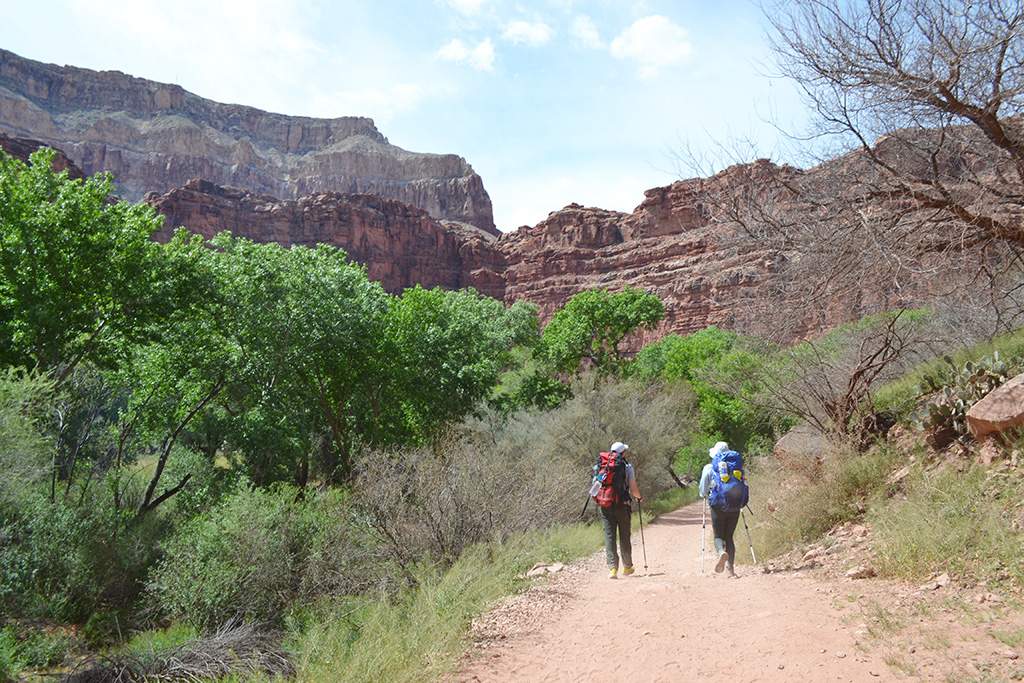
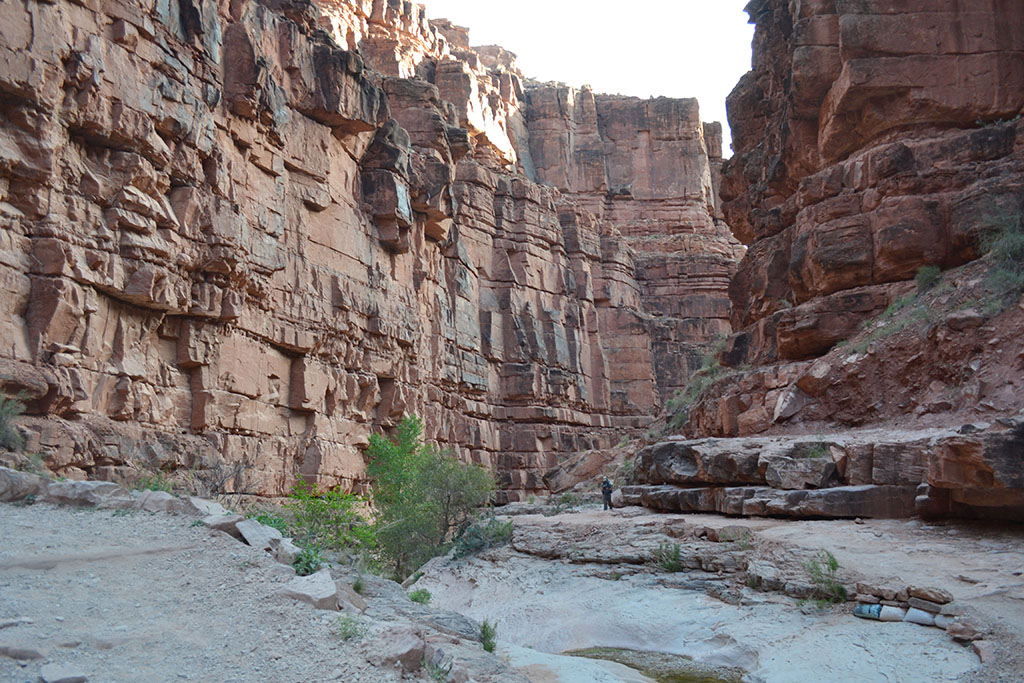
We turned down a dry wash and followed that for a long time until we reached Havasu Canyon and turned left. Within 1-2 miles we were at the village of Supai. We stopped at the first store for a cold drink and sat on picnic tables on the grass. It was so peaceful – a light breeze through the cottonwoods, mules nearby, dogs playing under the towering red cliffs. No photos allowed to respect those that live in Supai who are generously opening their home to us.
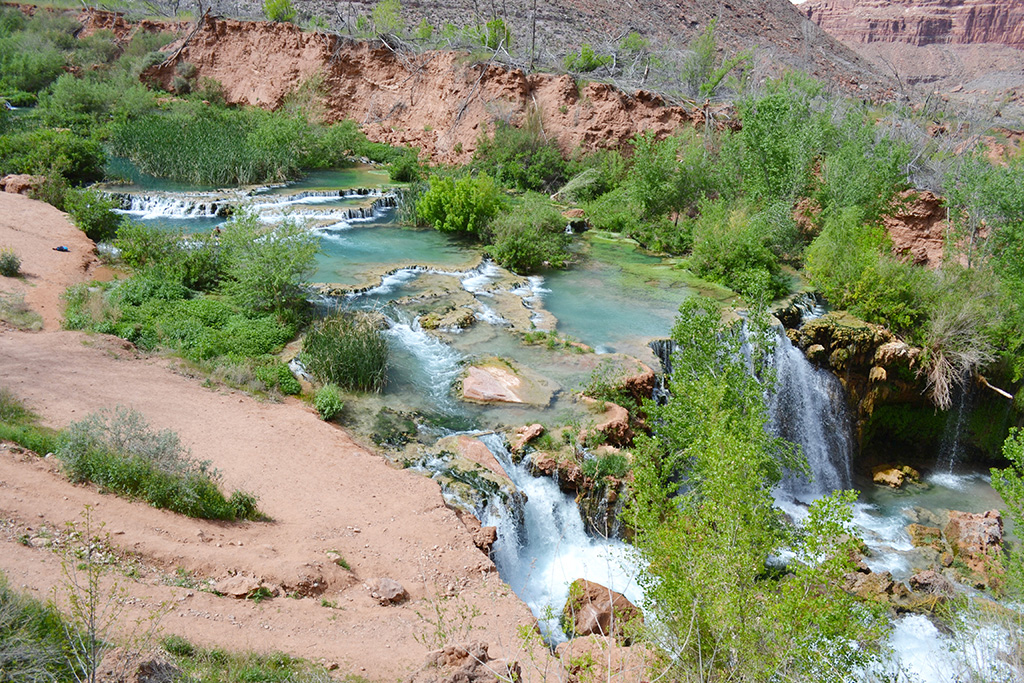
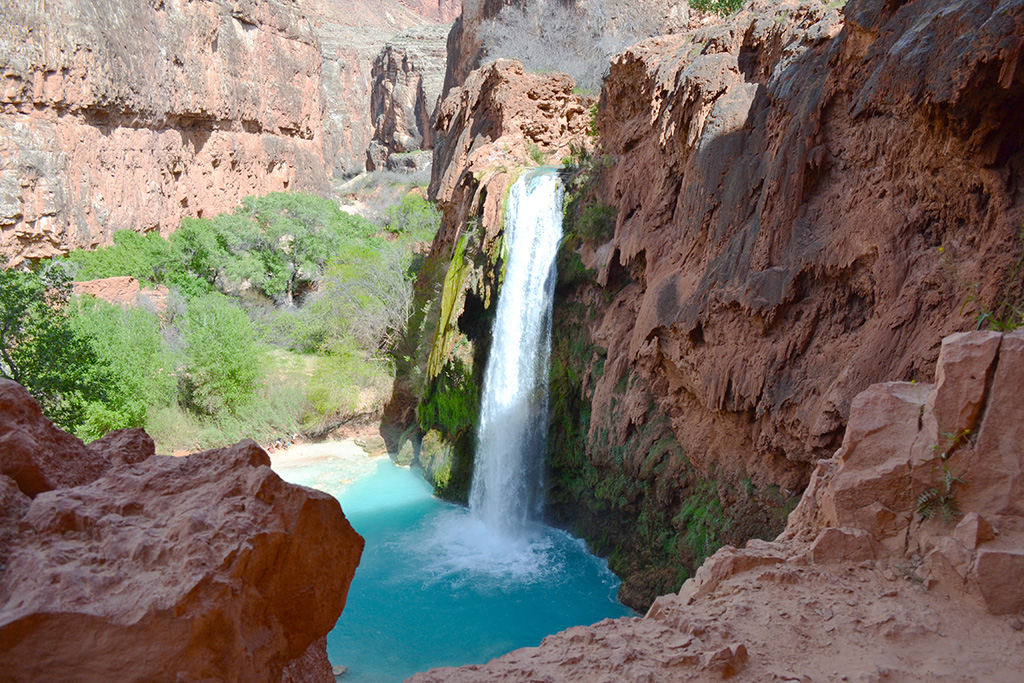
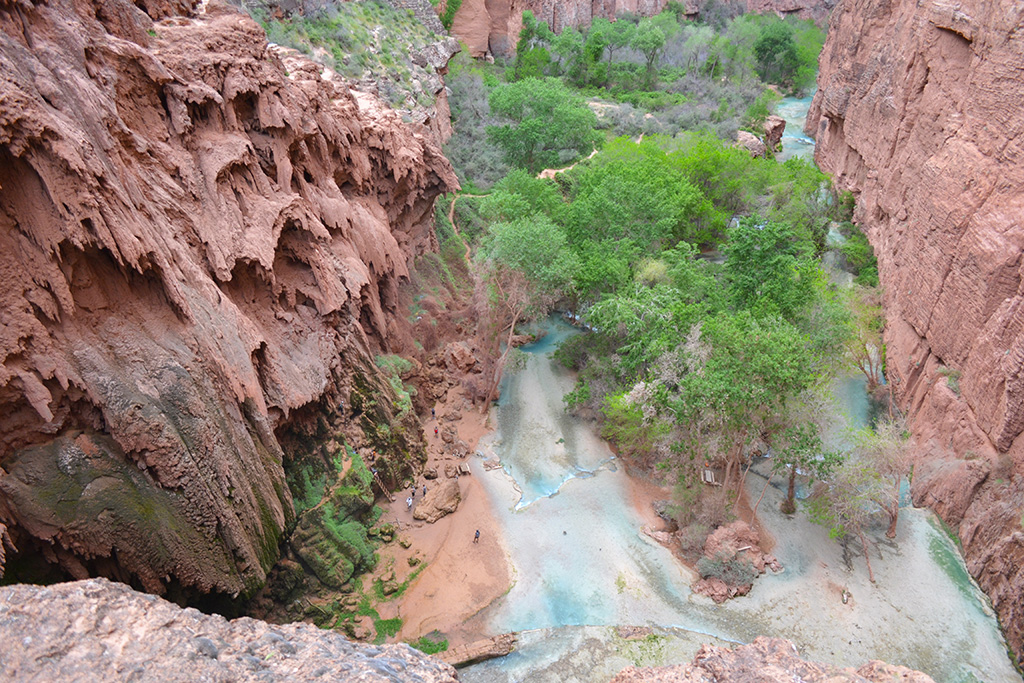
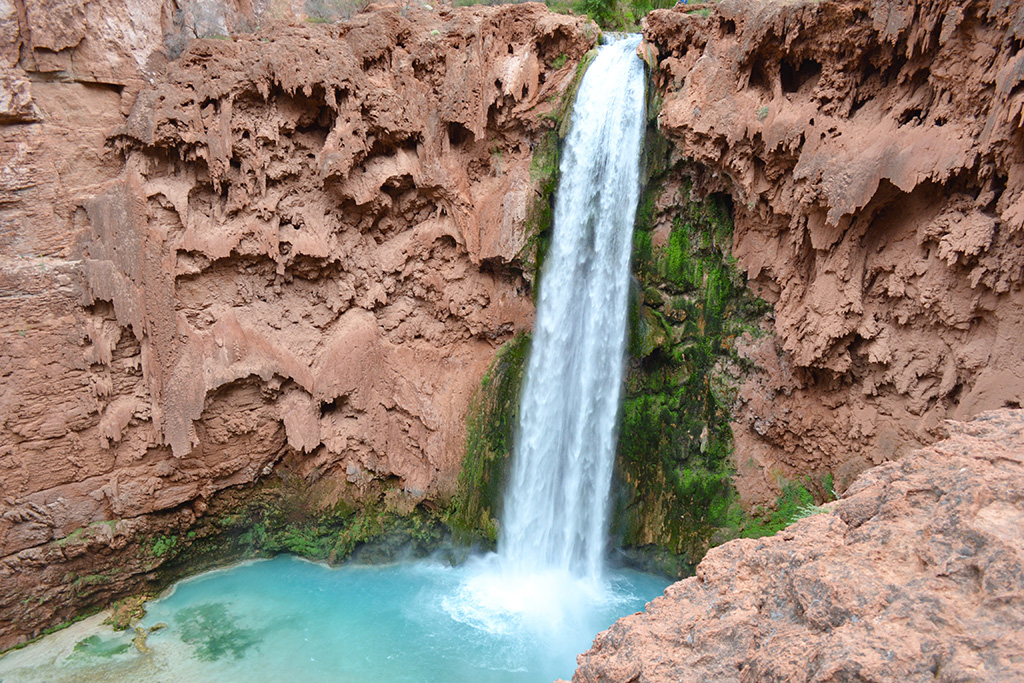
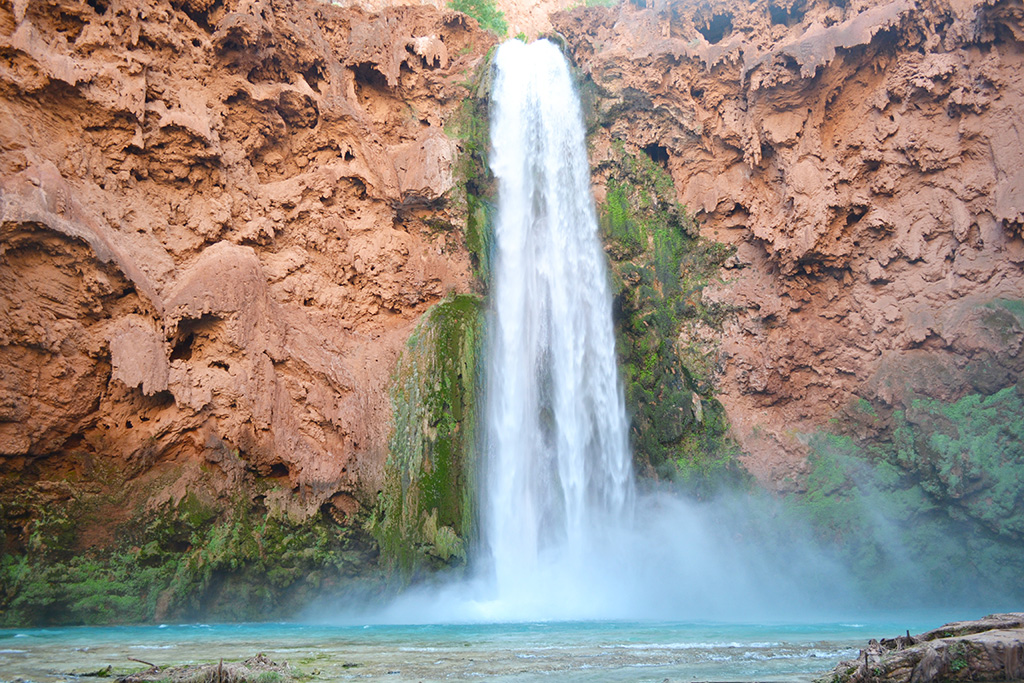
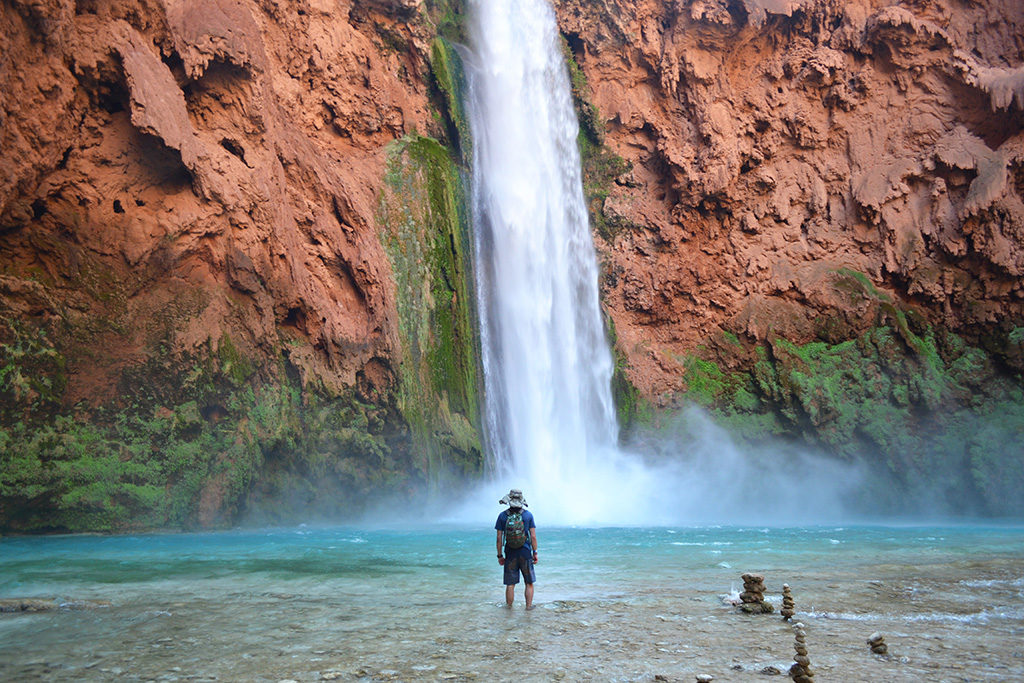
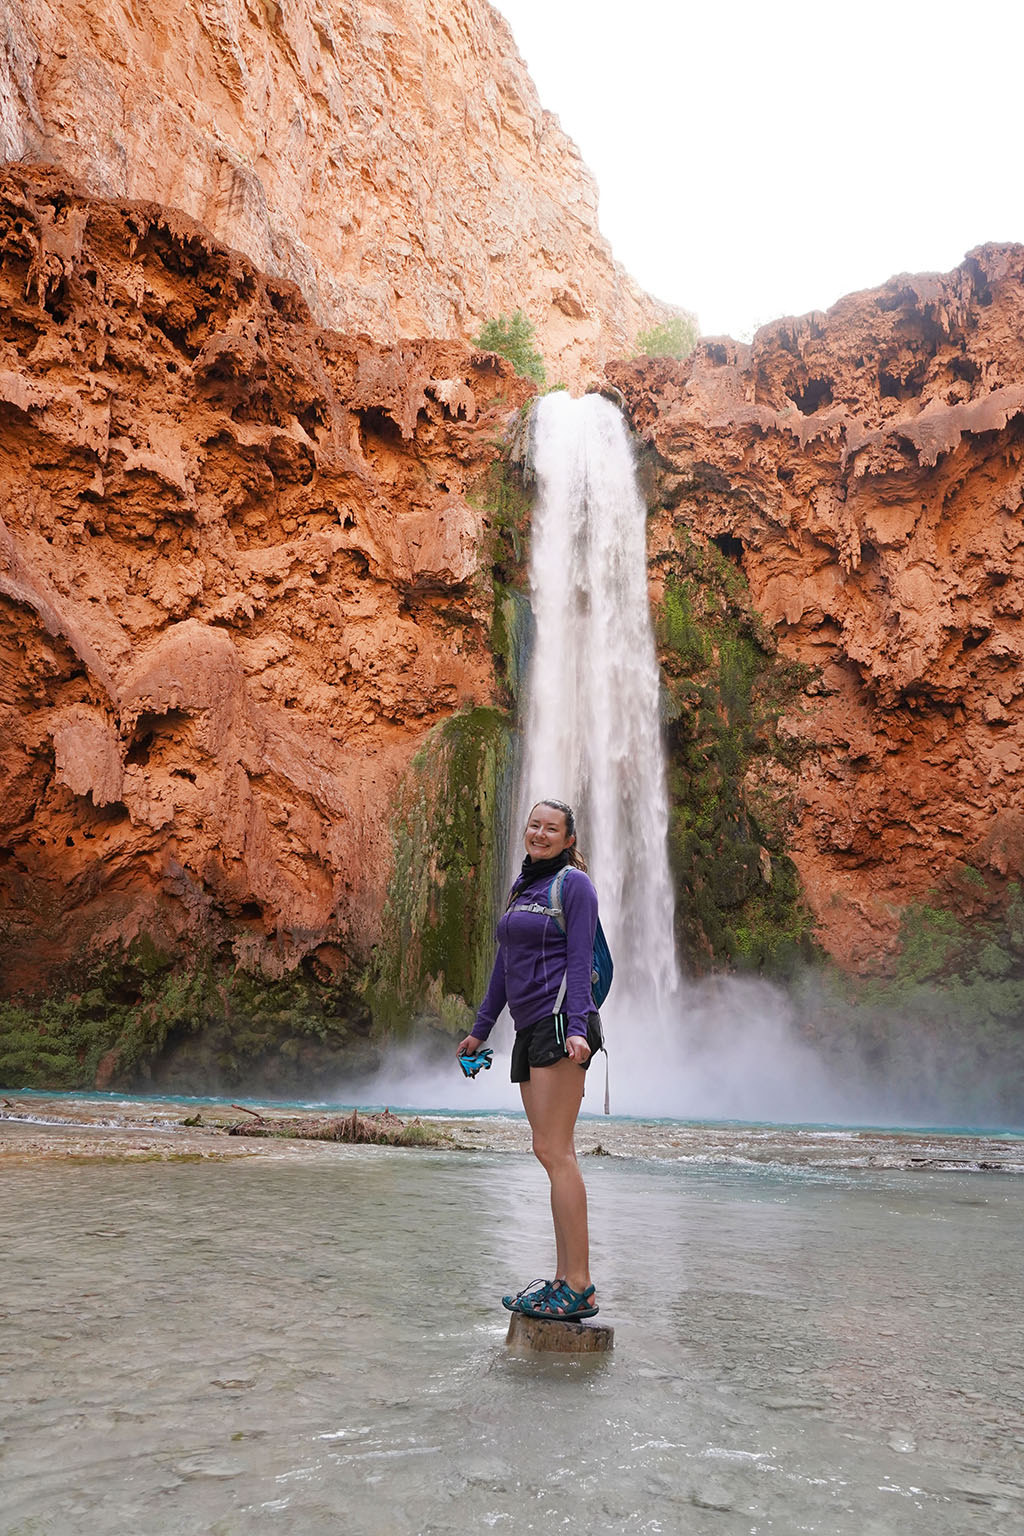
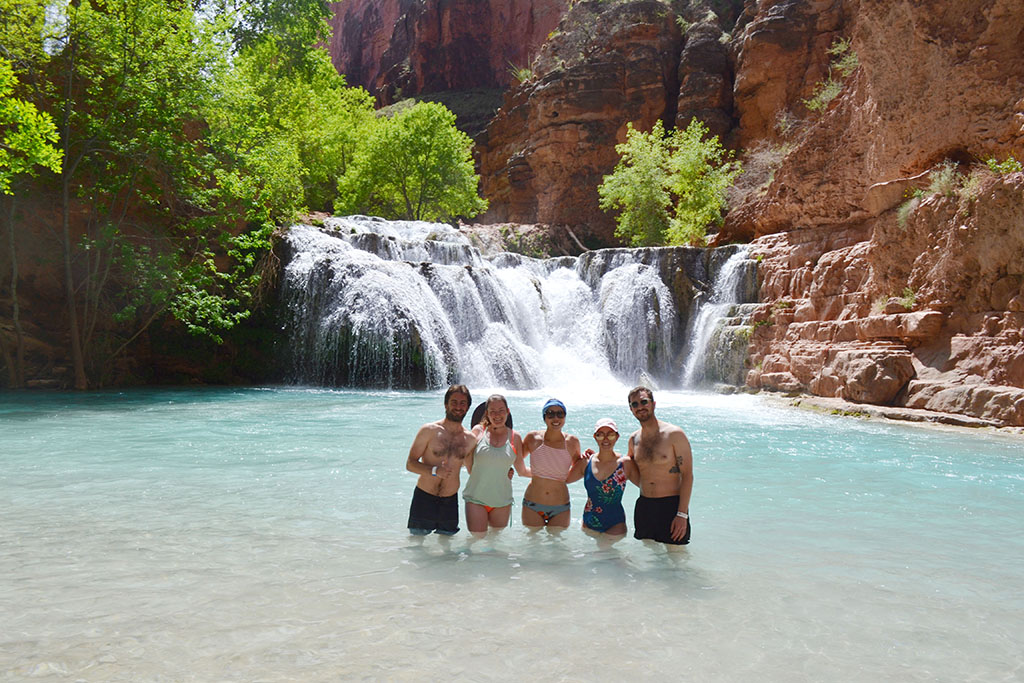
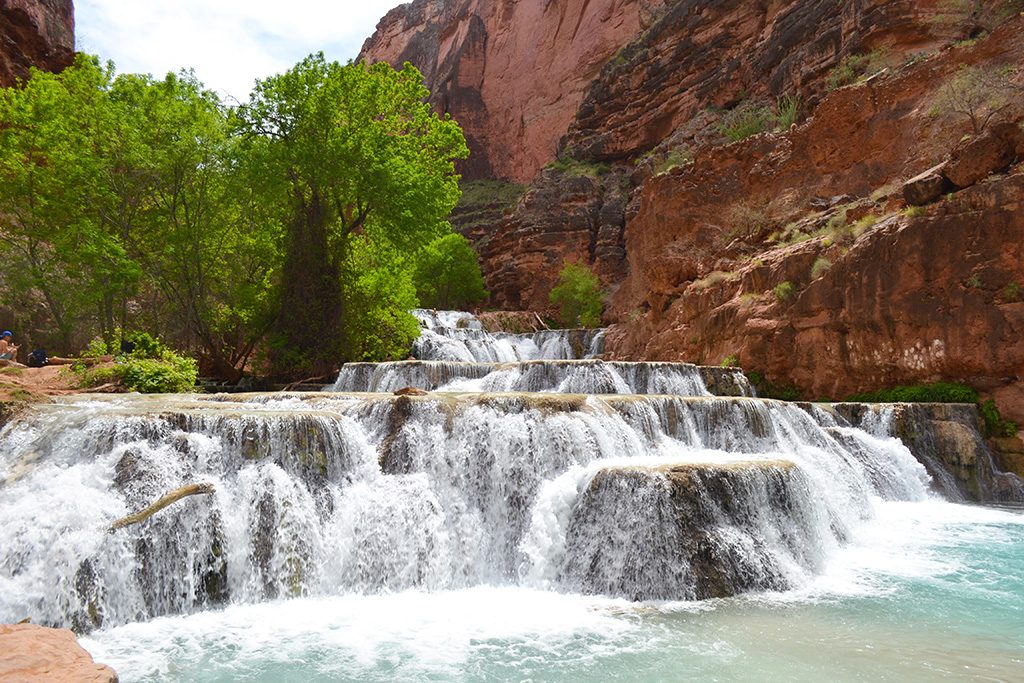
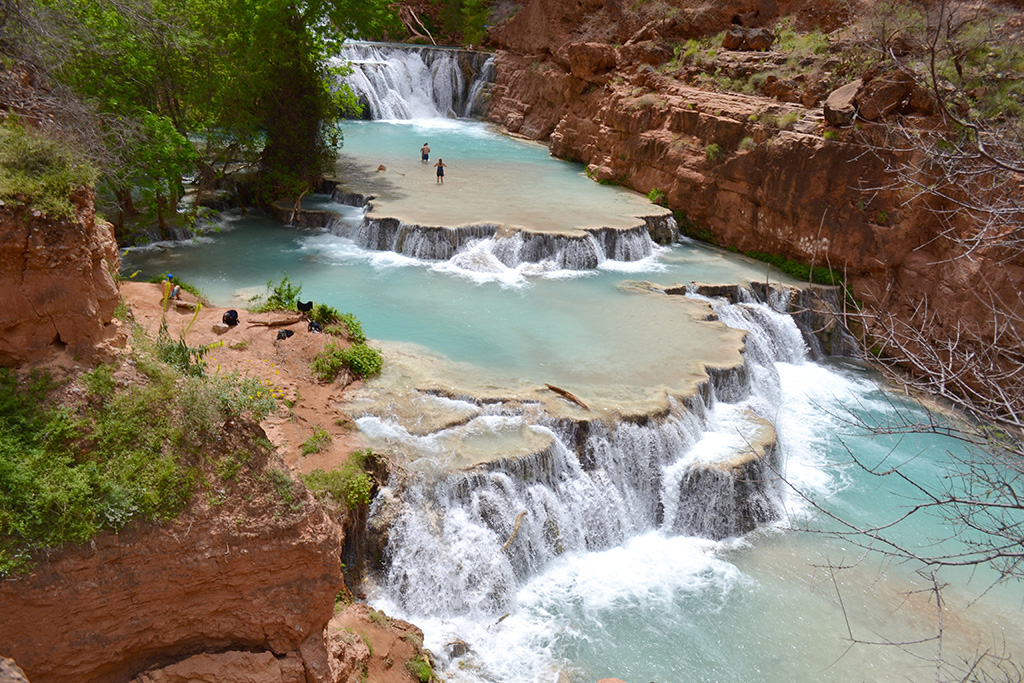
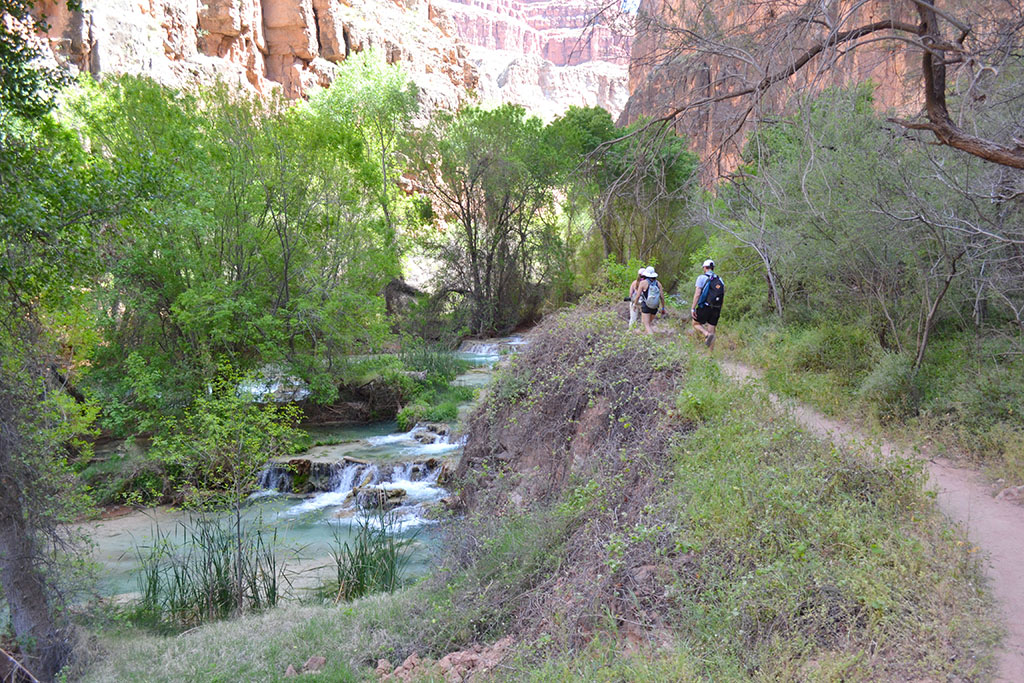
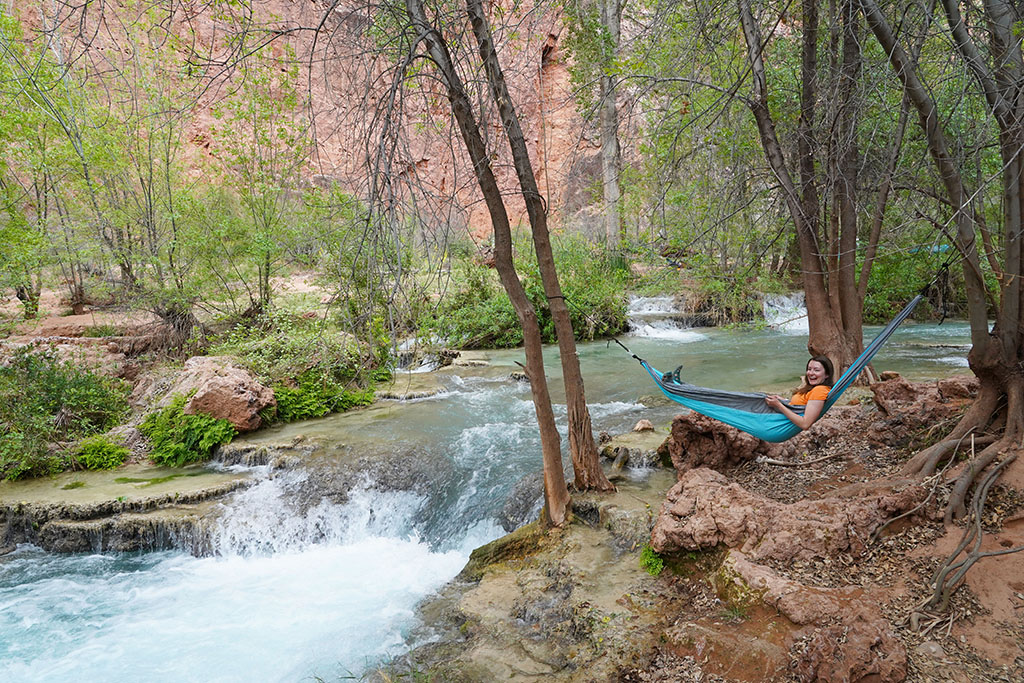
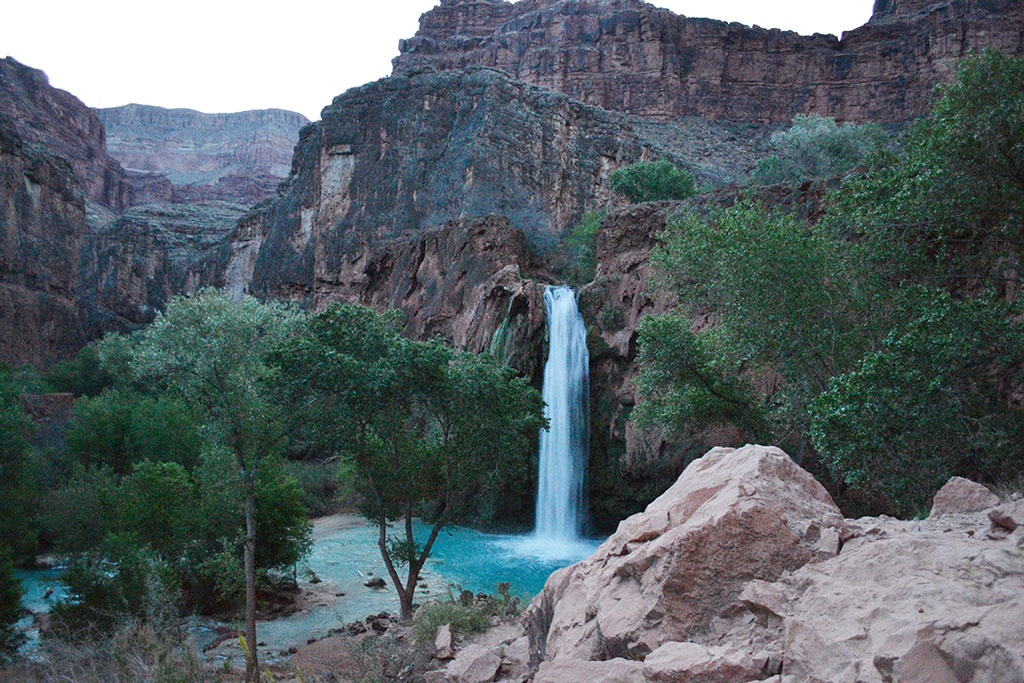
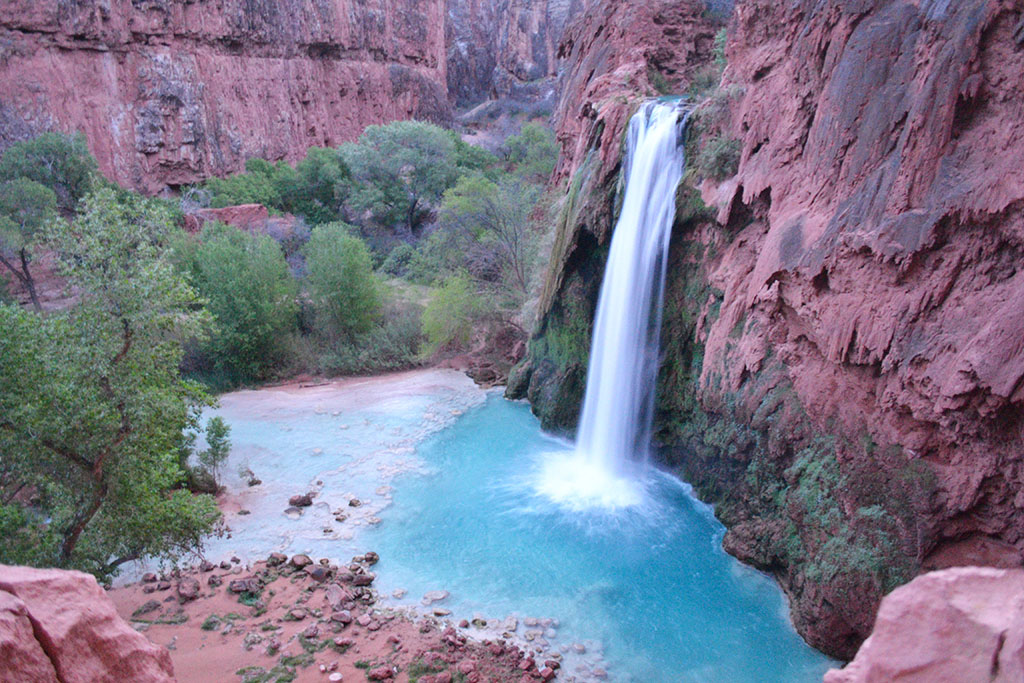
We got checked in and continued through the village and got a view of the first falls – Navajo and Fifty Foot. The photos of this place actually do it justice but it’s even more spectacular in person! We wanted to get a good campsite though so we sped past the frybread stands, admired Havasu Falls quickly, and explored our options. We lucked out at the very end of camp, before the boundary and above Mooney Falls. The spot was right alongside the creek too. What a campsite! Mooney is spectacular – powerful, tall, and that deep turquoise blue I was expecting. Tomorrow we will follow the ladders down to the base of Mooney and visit Beaver Falls too. Now – an early night listening to the creek rush by.

Day Two: Exploring Waterfalls (7 miles, +/-1100 feet)
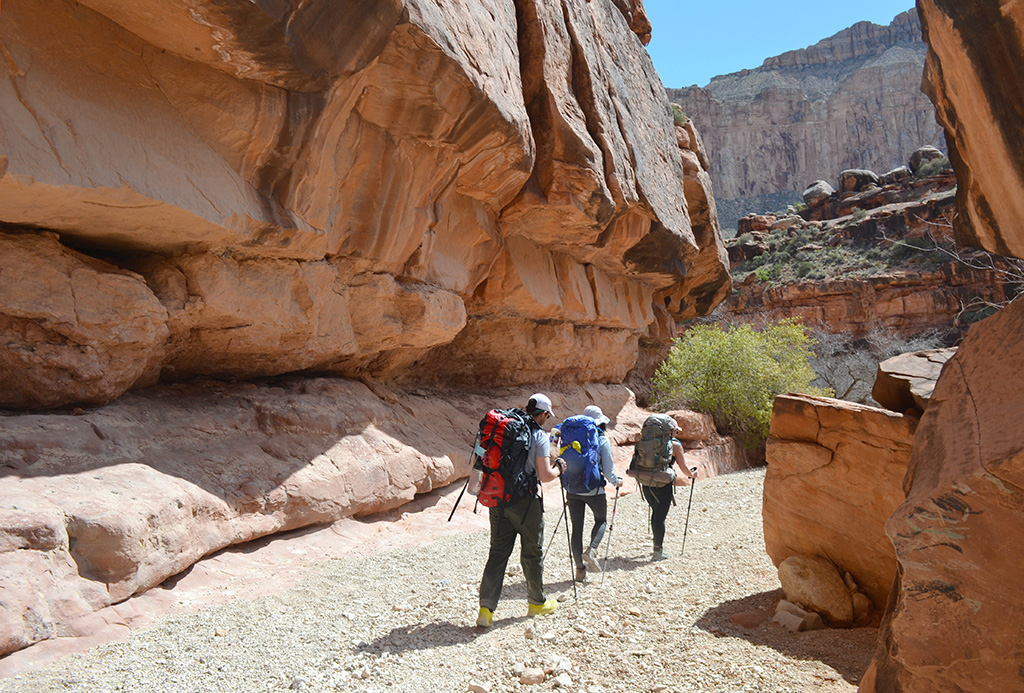
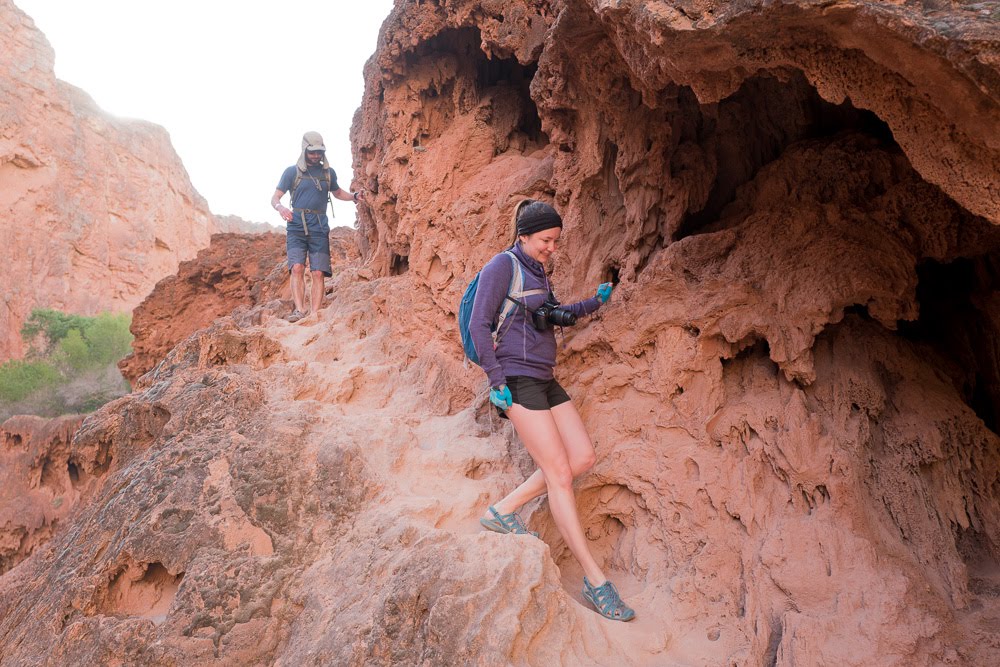
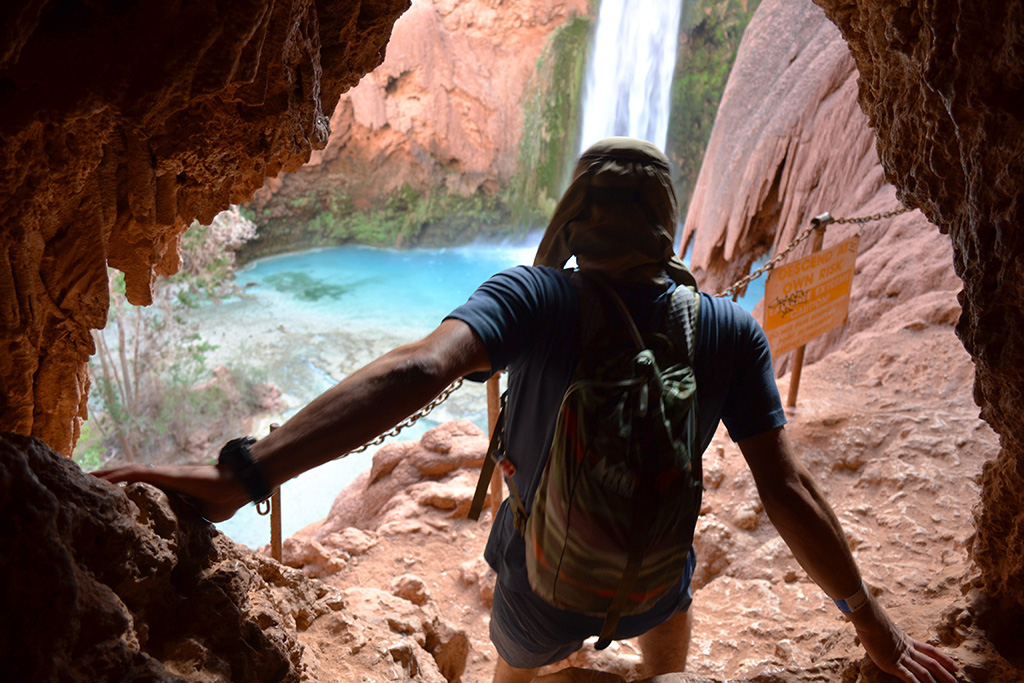
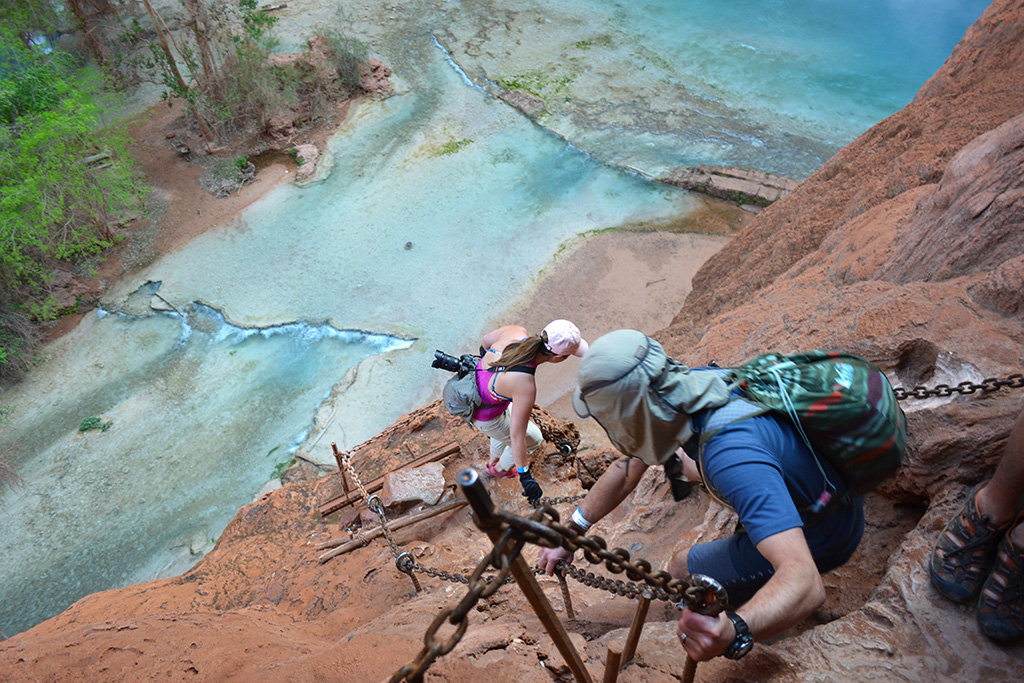
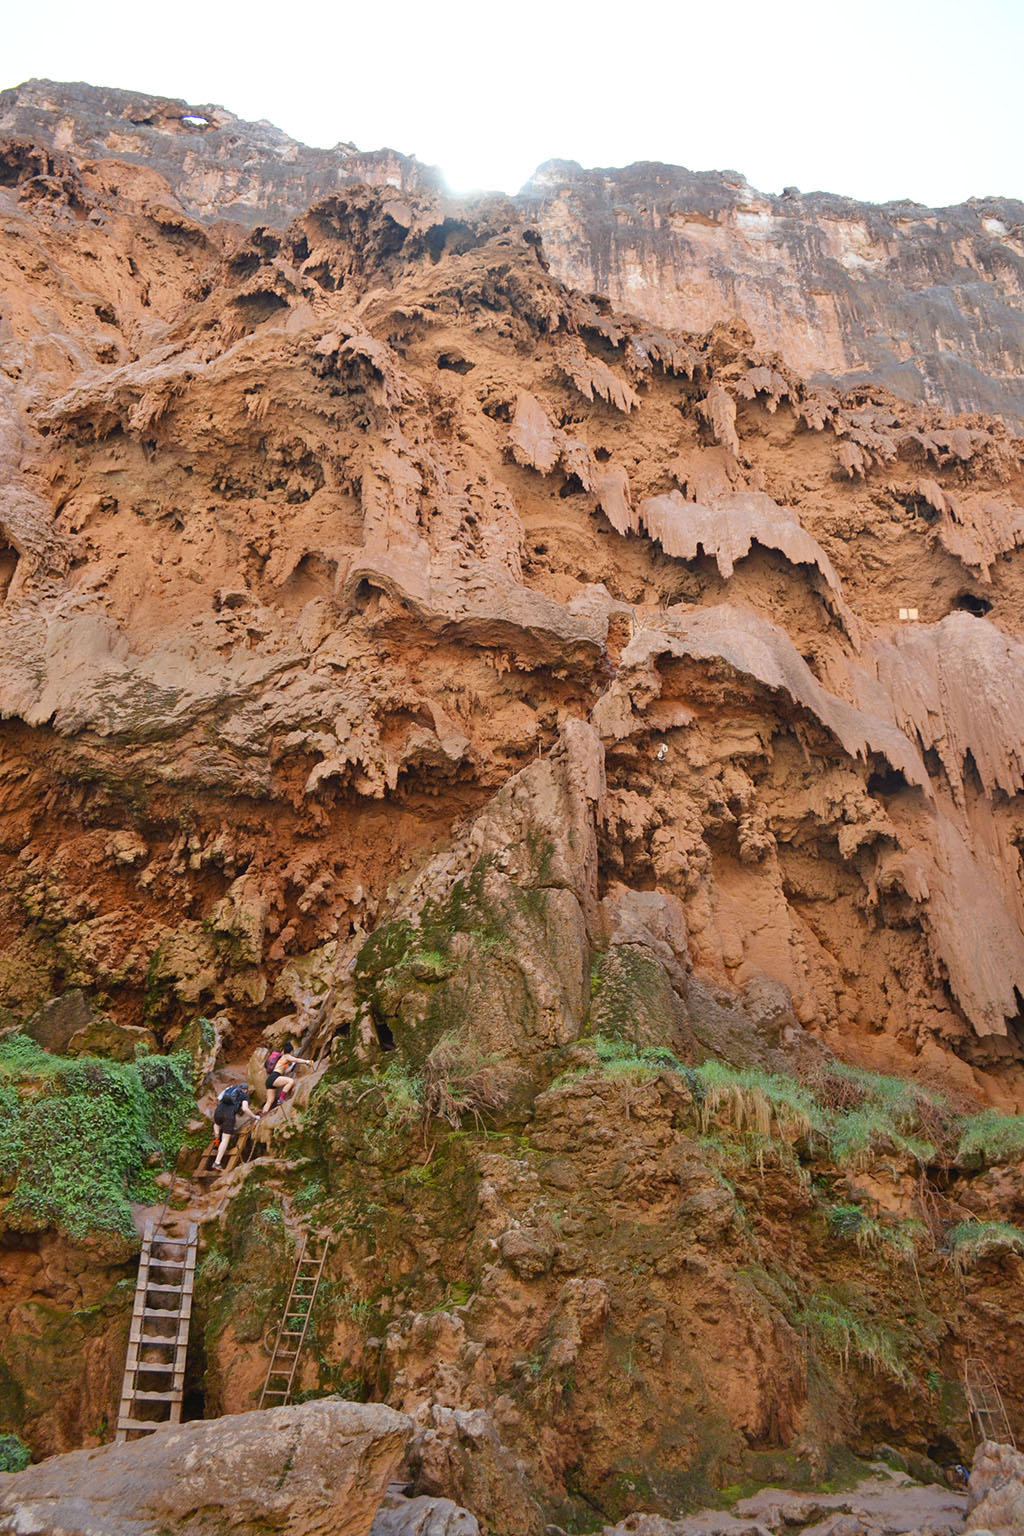
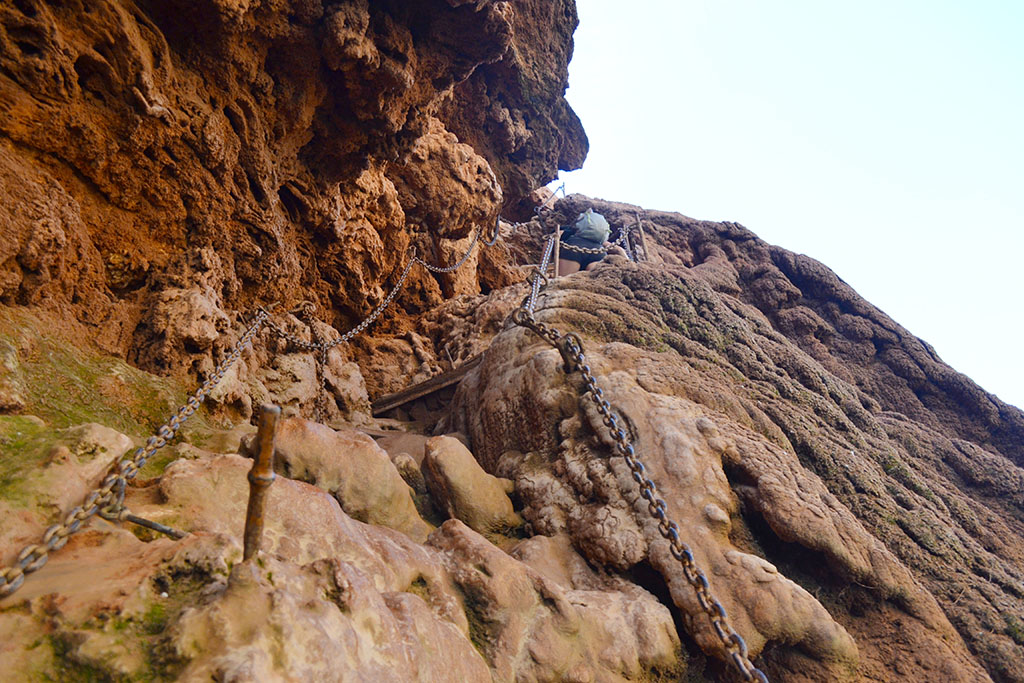
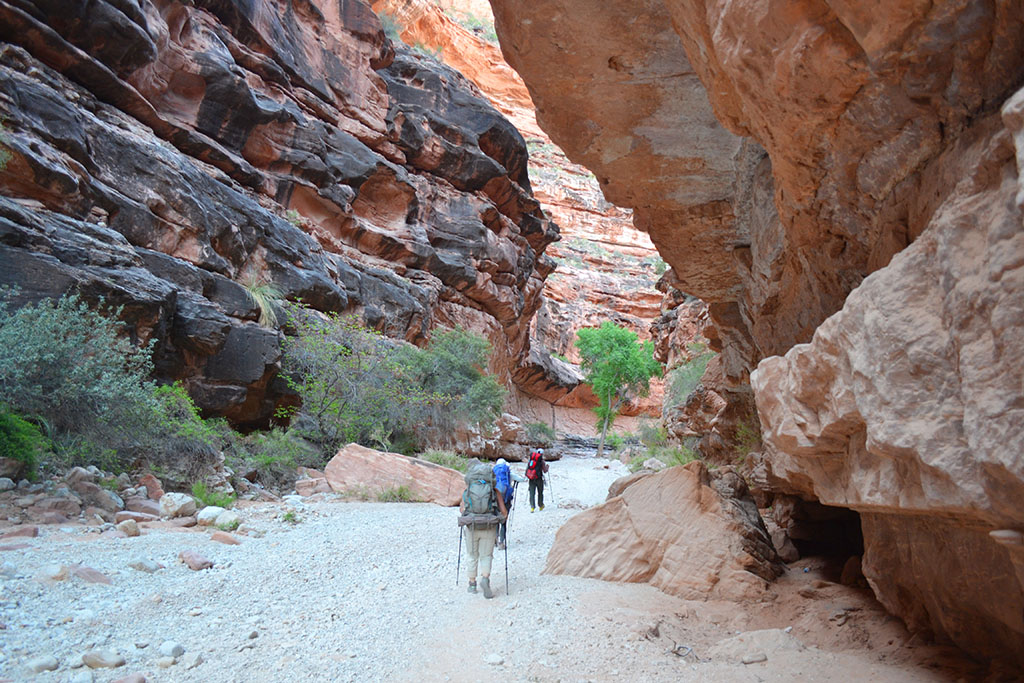
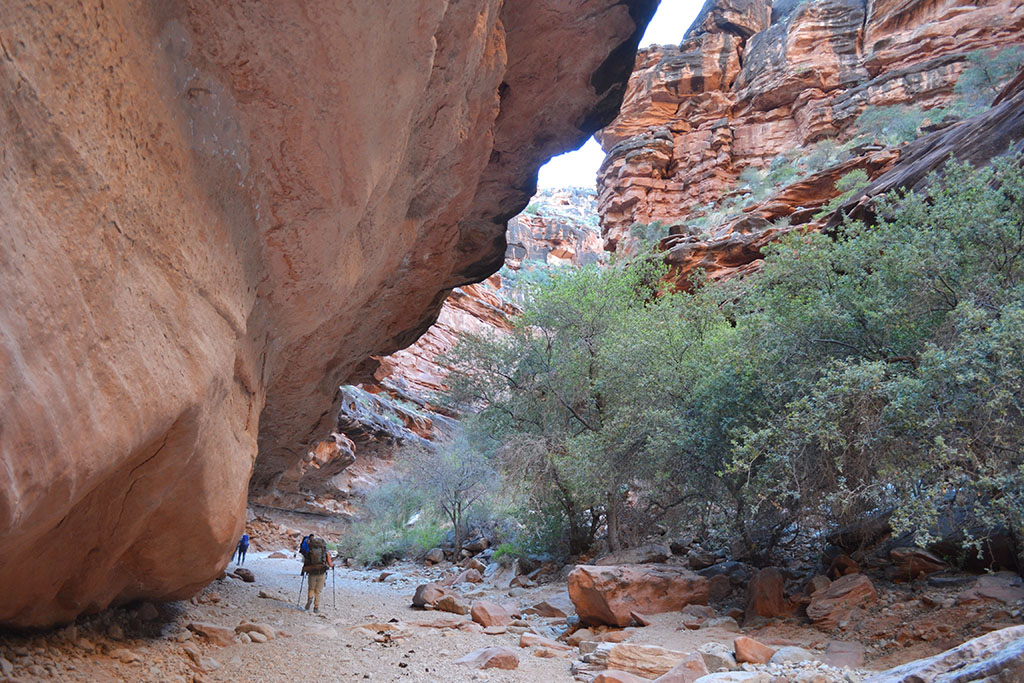
We woke up with the sun but had a leisurely morning around camp. Luckily my appetite was decent! We set off toward Mooney around 8:30AM with light day packs. I was glad I brought gloves because the climb down was pretty precarious – caves, chains, and ladders – all slippery from the mist of Mooney Falls! We admired Mooney for a while and then continued downstream to Beaver Falls. The walk was nice, down the canyon and we crossed through the creek a few times.
Luckily Beaver Falls wasn’t too crowded when we arrived. It was a multi-tiered pool with a large drop at the top, and it was easy to climb around and wade in the tiers. We ate lunch and enjoyed the water and sun until it got crowded. When we started the hike back it was much hotter in the afternoon. The trek was a little over 3 miles each way, and I managed to stay well hydrated.
I was tired when we got back so I sat in the hammock and read while the others hiked up to get frybread, not the best choice for my poor stomach. Afterwards we had a nice dinner and we’re turning in early to get up at 4AM and hopefully hike out before it gets too hot.
Day Three: Campground to Trailhead (10 miles, +2500 feet)
Even though it’s April the sun gets really harsh and there are very exposed sections of trail. So we packed up camp early and hiked out around 5:30AM, starting in the dark with headlamps. The sun came up as we reached the other end of the campground. We packed plenty of water, expecting it to be really hot. Luckily Jason carried most of my gear out to take the load off my pregnant body.
The stretch of hiking after Supai through the canyons was almost entirely shady. However, when we came out onto the bluff area below the final switchbacks it was very hot and exposed. I was a little envious of the helicopters that started making trips above us, but we made it out just fine. We reached our car and enjoyed some snacks and cold beverages in Peach Springs before driving all the way home to Los Angeles.
Though there were some mixed feelings in our group due to the crowds, I really enjoyed our Havasupai trip and exploring the waterfalls and canyons. I think it’s one I can check off the list now, though I may need to bring baby Josh back so he can actually see the waterfalls!
Logistics
The trickiest part of planning this trip is securing a permit – lots of details on that below. Once you have a permit there are tons of resources online to help with planning – including the Havauspai website and trip guide (available once you create an account), Facebook groups, and trip reports. If you do get a permit, read all the rules very closely. For example, you must bring your photo ID, and all hikers must create an account on the tribe website.
Permit
The information below applies to the 2020 permit period
Permits are required for every hiker and are checked at various points along the way, including on the drive in and while hiking. In some cases you may be nearly to Supai before getting turned around. We watched this happen to a very sad group who had to hike all the way back up in the heat of the afternoon without even seeing the creek. The good news is there’s a simple (though challenging!) permit system.
Permits are released through the Havasupai Reservations Website on February 1st for all dates that year. The reservation calendar opens at 8AM Arizona time and it’s a mad rush to work through the reservation system as fast as possible to claim a space.
Here are some tips to help you secure a permit on February 1st:
- Create your profile ahead of time. There are several steps to go through and lots of information to input. You don’t want to be doing this while everyone else is claiming spaces.
- Plan with your group ahead of time and know what dates will work. Once you get onto the calendar the spaces fill up extremely fast and there won’t be enough time to check everyone’s availability.
- Have multiple group members take a shot at the website. But stay in contact to avoid double booking – these permits are expensive!
- Have the website open and ready to go before permits are released. Refresh the page like a crazy person. Be prepared to use different browsers if one works better.
- Keep trying! After 1.5hrs of waiting for the website to respond and going through the steps multiple times, it finally worked for me and we got the dates we wanted!
As of January 2020 the permit cost information has not yet been released. However in 2019 the cost of a 3-night trip (the only option for trip duration) was $300 to $375 per person depending on dates. The cost in 2020 is expected increase.
Permits are non-refundable and non-transferrable except for two options which must be done through the website. The first is to setup an alternate leader in your profile in advance and officially transfer the permit over to that individual if the leader will not be present. The second option is the public cancellation and transfer list. You can also use this public cancellation board to look for availability if you are not able to get a permit on February 1st.
Campground
Most hikers opt to stay in the campground which is 2 miles past Supai Village. The campground itself is about 1 mile long with tent sites on both sides of the creek. There are several outhouses as well as a water spring. Although it’s a bit of a trek to get back up to the village for food there are frybread stands outside the campground with lots of tempting options.
Additional Amenities
The permit website also has the option to reserve a pack mule to carry your gear each way. Information and options will become available once you have a permit.
The Havasupai Lodge has 4-person rooms available for $440 per night with an additional $110 entrance fee per person (cost for 2020). Reservations must be made over the phone. More details here.
Helicopter transport is available between the trailhead and Supai Village. These spaces are first come first serve pending weather and only available on certain days of the week. More details here.
Tips for your Trip
- If you are planning for this to be your first backpacking trip, I’d recommend doing a gear shakedown on at least a casual local trip if possible. If for no other reason than to figure out what gear you truly need and to lighten your load. For more advice on your first backpacking trip, see this article.
- Be prepared for crowds, not solitude, so your expectations are set
- Prioritize getting a good campsite if that’s important to you – you can come back to the falls later
- Don’t rely fully on amenities in Supai. For instance the café was closed when we visited, and luckily we weren’t planning to use it. Similarly, if you think the only way you can get out of the canyon is to use the helicopter service there is no guarantee that trips will happen each day
- On challenging hikes (like getting out of Havasupai) it helps me stay motivated if I break the trail down into milestones. For Havasupai that might be leaving the campground, passing Supai, turning up the wash, and getting to the bottom of the switchbacks. That helps me realize I’m making progress and lets me focus on smaller steps.
- Read the rules carefully. The Havasupai Tribe is very strict with certain policies such as photography, alcohol/drugs, drones, etc and violating them can cost you heavily. Not following procedures for permits can force you to turn around before you even reach the creek.
- Leave no trace and pack it out. Don’t plan to dump your garbage down in the canyon, pack it out!
getting there
From Los Angeles it’s a 6-7 hour drive to Peach Springs, where the closest hotels are. It’s another hour and 15min drive to the trailhead from there. When we visited there was also a quick pit stop along the way to the trailhead where our permit was checked.
Season
The best time to go is whenever you can get a permit! Here are some things to look out for in each season:
- Winter: Havasupai is closed for hiking
- Early Spring, Late Fall: mild temperatures during the day that may be a little too cold for swimming but ideal for hiking. Low temperatures overnight can mean packing extra layers and good sleeping gear.
- Late Spring, Early Fall: rising daytime temperatures make for nice swimming but earlier hiking.
- Summer: high temperatures can exceed 100F so it’s essential to plan your hikes early in the morning, ideally before sunrise. Monsoon season also occurs during July and August, which can cause flash flooding in the area (see example here).
When we visited in April we had reasonable temperatures during the day. It was a little too cold for comfortable swimming but perfect for hiking until the peak of the afternoon. We were careful about hiking in the morning, but not too worried about it as we would be in the summer.
Recommended gear
Bear Canister
Although there are no bears in Havasupai, there are other animals that can break into your food so the guide recommends using a bear canister. See my bear canister comparison page for more options.
Water Filter
Drinking water is available in Supai and at one spring within the campground. All other sources (and possibly the spring as well) should be filtered. A gravity bag like this also lets you carry a large volume of water from the spring to camp.
Cook Set
A lightweight cook set is a necessity for hot meals at camp.
Stove
A stove for cooking.
Headlamp
For early morning hiking and hanging around camp at night.
>> Click here for all of my gear recommendations
Comments